Are you tired of dishes that never actually get cooked, or do you find complicated instructions hard to understand? Do you also want to enjoy food that’s incredibly delicious but super easy to make? Then you’re not far from it now. You’re probably already familiar with the revolutionary frozen dumplings available online. Today, I’m here to show you exactly how to master them.
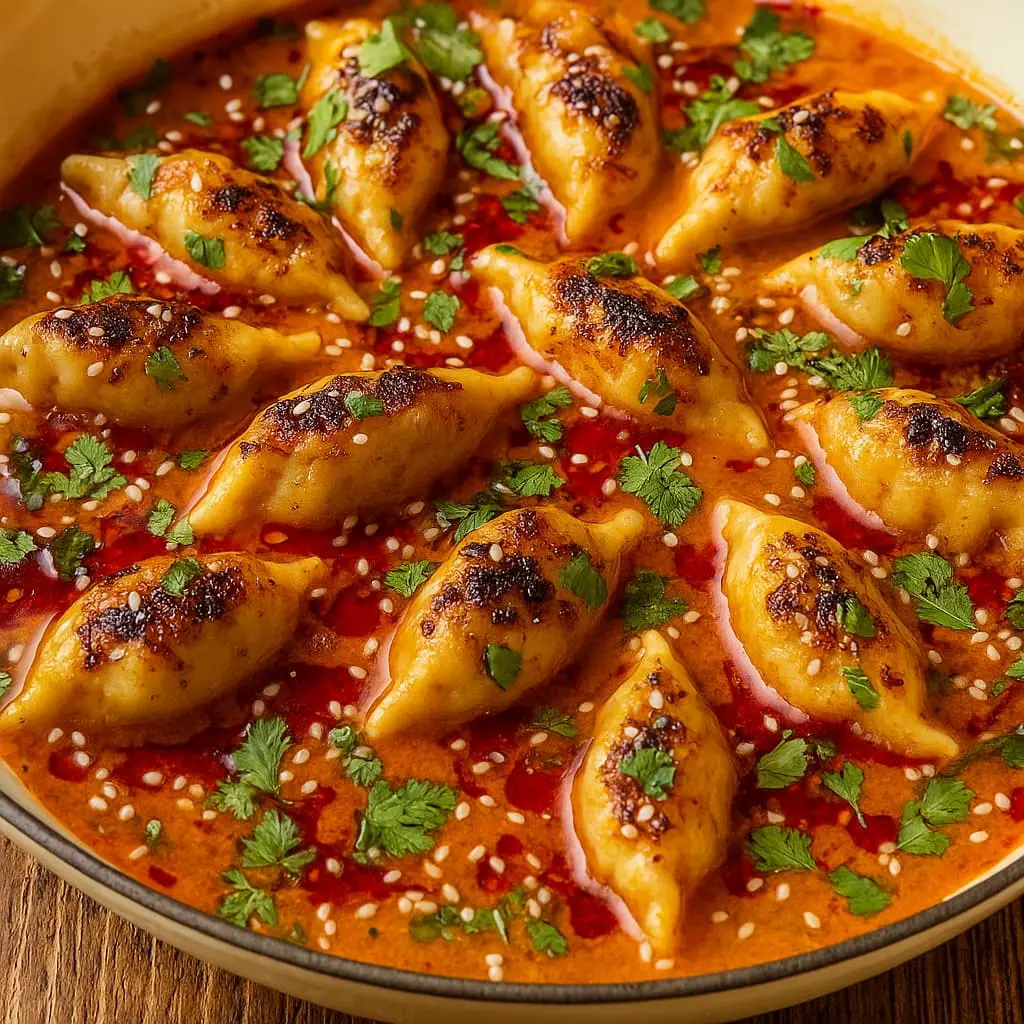
One pan baked dumplings, this is more than just a trend. With crispy bottoms, tender fillings, and barely any cleanup… it’s a full-on revolution. All of that, in just one pan? That’s a wow moment.
This recipe is specially designed for busy individuals, new home cooks, or families looking for a quick, easy, and delicious weekend meal. And if you’ve been tempted by the viral food trends all over social media then you’re exactly where you need to be.
This method isn’t just convenient, it’s genius. Here are a few solid reasons why these viral dumplings are about to completely change the way you do weeknight dinners:
1. Time-Saving & Minimal Effort
Say goodbye to standing over a hot stove flipping dumplings one by one. This recipe hands over all the hard work to your oven while you sit back and actually enjoy your evening.
2. Minimal Cleanup
Let’s be honest, what’s the biggest pain point for most home cooks? Dishes. Ugh. No one wants to be scrubbing pans on the weekend. With this recipe, there’s no mess, just one pan or skillet, and you’re done.
3. Crispy Bottoms, Tender Filling
This baking method gives your dumplings that irresistible golden crisp on the bottom, while with juicy and tender filling. Normally you’d have to pan-fry to get that perfect texture here, the oven does it all for you.
4. A Complete Meal in One
Toss in some quick-cooking veggies, and you’ve got a complete, balanced, and satisfying meal with real nutritional value, all in a single dish.
5. Fear-Free Cooking
Worried your dumplings will stick, burn, or come out undercooked? This method takes out the guesswork and delivers perfect results every single time.
The Recipe: Viral One-Pan Baked Dumplings
To make this recipe perfect, follow the ideal baking time and temperature below:
Once you follow these steps, you’ll get crispy-bottom dumplings without ending up with dry filling.
Essential Equipment:
-
- Large oven-safe skillet (10–12 inch cast iron or a ceramic baking dish is ideal)
-
- Parchment paper (for easy cleanup and to prevent sticking)
-
- Small bowl + whisk (for mixing the sauce)
-
- Tongs or spatula (for easy serving)
For the Dumplings & Base:
-
- 1 (16–20 oz) package of quality frozen potstickers or gyoza (around 30–40 dumplings)
-
- 1 tablespoon neutral oil (such as vegetable or canola oil)
-
- ½ cup water or use low-sodium chicken or vegetable broth for extra flavor
For the Sauce:
-
- ¼ cup low-sodium soy sauce (or Tamari for a gluten-free option)
-
- 1 tablespoon toasted sesame oil
-
- 1 tablespoon rice vinegar
-
- 1–2 teaspoons brown sugar or honey (adjust to your preferred sweetness)
-
- ½ teaspoon grated fresh ginger (optional, adds a nice zing)
-
- 1–2 teaspoons chili garlic sauce (optional, adjust based on your heat tolerance)
Optional Garnishes (Highly Recommended):
Step-by-Step Instructions
1. Preheat and Prep Your Pan
Preheat your oven to 400°F (200°C). Place your baking dish or skillet inside the oven while it heats, this helps evenly distribute heat and ensures those perfectly crispy bottoms. While it’s preheating, line your surface with parchment paper to make cleanup a breeze.
2. Whisk the Sauce
In a small bowl, combine the soy sauce, toasted sesame oil, rice vinegar, brown sugar or honey, grated ginger (if using), and chili garlic sauce (optional, for heat). Whisk until smooth and set aside.
3. Arrange the Dumplings
Carefully take the preheated pan out of the oven. Drizzle 1 tablespoon of neutral oil over the parchment paper. Place the frozen dumplings in a single layer, making sure to leave some space between them so they don’t stick together.
4. Add Water and Bake (Initial Bake)
Pour ½ cup of water or broth evenly over the dumplings. This step helps create steam, ensuring the dumplings cook through and turn out soft and tender inside.
5. Bake Until Crispy
Return the pan to the oven and bake for 15 minutes.
6. Add Sauce & Finish Baking
After 15 minutes, carefully remove the pan. Most of the water will have evaporated by now. Drizzle the prepared sauce evenly over the dumplings. If you’d like to add quick-cooking veggies (like bell peppers, snap peas, or broccoli florets), toss them into the pan now. Return the pan to the oven and bake for another 5–10 minutes, or until the dumpling bottoms are golden and crispy and the sauce slightly thickens.
7. Optional – Broil for Extra Crisp
For that irresistible crispy finish, turn on the broiler for the last 2–3 minutes. Keep a close eye to prevent burning!
8. Rest Before Serving
Once out of the oven, let the dumplings rest for 5 minutes. This allows the sauce to thicken further and the flavors to settle beautifully.
9. Garnish & Enjoy
Top with chopped green onions, toasted sesame seeds, and fresh cilantro. Serve immediately and prepare to be amazed, crispy, saucy, and absolutely delicious!
Tips for Best Results
Preheat Your Pan
This step is non-negotiable if you want those beautifully crispy bottoms. A hot pan gives the dumplings that golden crust right from the start.
Don’t Overcrowd the Pan
Make sure to give your dumplings some space! If they’re packed too tightly, they’ll steam instead of bake, leading to soggy, limp results.
Quality Matters
Choose high-quality frozen potstickers or gyoza. Look for ones with flat bottoms and sturdy wrappers; they hold up best during baking and crisp up beautifully.
Customize Your Sauce
Taste your sauce and tweak it to suit your preference. Want it sweeter? Add more sugar. Like it spicy? Try chili flakes or sriracha. Craving tang? A squeeze of lime works wonders.
Parchment Paper Is Your Best Friend
It prevents sticking and makes cleanup ridiculously easy. Don’t skip it!
Let Them Rest
That final 5-minute rest isn’t just a pause; it allows the sauce to slightly thicken and the flavors to settle in. Trust us, it’s worth the wait.
Variations & Customization
This recipe is incredibly versatile, don’t be afraid to get creative and make it your own!
Protein Boost
Want to add more substance? Toss in some cooked shredded chicken, crumbled tofu, or even shrimp (just add it during the last 5 minutes of baking) for an extra hit of protein alongside your dumplings.
Veggie Power
Amp up the nutrition by adding quick-cooking vegetables like thinly sliced bell peppers, mushrooms, shredded carrots, or a handful of spinach halfway through the baking time. You’ll turn this into a balanced, colorful, and satisfying one-pan meal.
-
- Spicy Peanut: Add 1–2 tablespoons of peanut butter to the sauce for a creamy, nutty twist.
-
- Sweet & Sour: Splash in a bit of pineapple juice and an extra spoon of brown sugar for that sweet-and-tangy flavor.
-
- Thai-Inspired: Stir in a small spoonful of red curry paste and finish with a squeeze of lime for a bold, aromatic kick.
Herb Heroes
While green onions and cilantro are classics, feel free to explore other fresh herbs like Thai basil or mint. They’ll bring a refreshing burst of flavor and take your dumplings to the next level.
Storage & Reheating Instructions
Oh! Got some leftovers? No worries at all, these dumplings reheat beautifully with just a little care.
Storage
Let the dumplings cool completely, then transfer them to an airtight container. Pop them into the refrigerator, and they’ll stay fresh for 3–4 days, no stress.
Reheating
For the best texture, reheat them in the oven or air fryer at 350°F (175°C) for about 5–10 minutes, or until the bottoms are nice and crispy again.
You can use the microwave if you’re in a rush, no problem, but just a heads-up: the crispy bottoms will soften.
Troubleshooting Common Baked Dumpling Issues
No one’s perfect and mistakes can happen from all of us. Sometimes your dumplings might have soggy bottoms, sometimes they won’t cook evenly, and sometimes… well, something or the other just goes wrong. But no worries, I’m here to help! If you’re facing any of the following issues, here are the causes and fixes:
Soggy Bottoms
Prevention:
Make sure your pan is properly preheated, always use parchment paper, and avoid overcrowding the pan.
Solution:
If the bottoms still turn out soft, don’t stress! Just broil for 1–2 minutes, but keep a close eye so they don’t burn.
Uneven Cooking
Prevention:
Arrange dumplings in a single layer with space between them, and rotate the pan halfway through baking.
Solution:
If some dumplings still look pale, rearrange them and give them a few more minutes in the oven.
Dumplings Sticking
Prevention:
Always use parchment paper! Also, make sure your preheated pan has a thin layer of oil before placing the dumplings.
Solution:
If a few do stick, use a thin, flexible spatula to gently lift them while they’re still warm.
Dry Fillings
Prevention:
Be sure to add ½ cup of water or broth, don’t overbake, and stick to the recommended cook time.
Solution:
Just drizzle a bit of extra sauce on top before serving, it’ll bring the moisture and flavor right back.
Final Thoughts
All I want to say is that these dumplings look so delicious. I mean, I’ve always loved dumplings (and honestly, who doesn’t?), but this one-pan method takes things to a whole new level. You’ve got to give this recipe a try and when you do, let me know how it turned out for you.
Enjoy every crispy, juicy bite!


